Drilling into porcelain tile can be a daunting task. It is one that most people don’t think about until they need to do it. Fortunately, you can do it in 11 easy steps. The first thing you should know about drilling through porcelain tile is the type of drill bit you will need for the job.
This blog post focuses on how to drill through porcelain tiles, but also includes helpful tips like what tools are needed and what type of drill bit set would work best for your home improvement project.
Step 1: Safety First
Make sure the area is well-ventilated and unplug your drill. It’s also a good idea to wear safety glasses or goggles when drilling through tile.
You should always consider wearing eye protection regardless of what project you’re tackling, but it is especially important for this type of job because porcelain can shatter easily; even more so than other types of tile.
Step 2: Prepare the Surface
It’s important to make sure you have a level surface and that it is perfectly dry before beginning your project. Even if the area looks level, take some time to check for any imperfections in the porcelain tile so you can plan accordingly and not be disappointed with the finished product.
The next step is to locate a stud in the wall because you will want your drill bit to go through the tile and into the stud for added support.
Of course, if there is no visible stud behind where you need to drill porcelain tile then this step won’t be possible without adding additional support from other materials such as plywood or luan board.
Step 3: Choose the Right Drill Bit
The size of the drill bit you’ll need for your project depends on the thickness of the tile. You can usually find this information in the product specifications. For example, a ¼ inch drill bit is good for drilling through a ⅛ inch thick tile.
There are several different drill bits that you can use to drill through porcelain tile. The most common type is a masonry bit, which has a pointed tip and is designed to drill through hard materials.
If you’re only drilling a small hole, a standard drill bit will work, but it’s not recommended for tougher materials like porcelain.
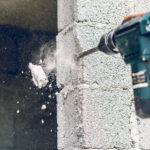
Step 4: Make Your Hole
Once you have the right drill bit, select an area on the tile where there is no grout or other type of sealer. You’ll want to avoid this because it could cause the drill bit to get stuck in the tile.
Now it’s time to start drilling!
When you’re ready, place the drill bit against the tile and apply pressure as you rotate it in a clockwise motion. You’ll want to continue drilling until the bit comes out the other side of the tile. Again, make sure you’re drilling in an area that doesn’t have any sealant or grout.
Step 5: Clean up the Mess
Once you’ve created a hole, wipe off any debris from the tile and use a vacuum to pick up anything that might be left behind on or around your tiles. It’s also important to make sure all of your tools are in one place before continuing with this project because you don’t want to have any tools go missing.
Step 6: Prepare for the Next Hole
After you’ve finished creating a hole, it’s time to prepare for your next drill through the porcelain tile project by setting up all of your materials near where you’ll be working so that they are within easy reach. This will help minimize distractions and make the process go a little smoother.
Step 7: Finish the Job
Now that you have a hole in your tile, it’s time to finish the job by putting whatever you’re going to use in the hole. This could be a plug for a sink, a screw for hanging something on the wall, or anything else that needs to be secured.
Congratulations! You’ve just drilled through a porcelain tile in 7 easy steps.