Wood is a great material for building structures or furniture because it can be strong and beautiful. However, to get the best look out of your wood, you’ll need to stain it. This guide will discuss how to properly stain the wood so that you can enjoy its natural beauty while also protecting against rot and decay.
Step 1: Prepare the Materials
- 120 grit sandpaper
- 80 grit sandpaper
- Stain
- Tack cloth
- Pre-stain wood conditioner
- Stir sticks
- 2 foam brushes
- 2 lint-free rags
Step 2: Prepare the Wood
One of the best things you can do to protect your new wood project from scratches is sanding it down. It’s important that before staining, we first prep our projects with 80 grit sandpaper for there be no damage or scarring on top coatings- which means they will last longer.
Then move on to 120 grit sandpaper one more time just to make sure everything looks new again.
Step 3: Wipe Down the Wood
You want your stain to be as smooth and even as possible, so it’s best not only after sanding but also before you start staining. Just use a tack cloth on any loose debris left behind from last time around with the wood-wiping down until everything looks nice and clean again.
The importance of cleaning up all those little pieces that can get stuck in between pores during these processes cannot really go unnoticed.
Step 4: Apply the Pre-Stain Conditioner
The first step to staining your wood is applying a pre-stain conditioner. This will help the color penetrate better and not be absorbed by pores on the surface like regular solvents can do, making it last longer.
To apply, pour a small amount of the pre-stain conditioner onto a foam brush and rub it into your wood in an even manner. Let it sit for up to five minutes before wiping off excess liquid from any area that has been applied.
Step 5: Wipe Off the Excess Pre-Stain Conditioner
You want to ensure that you wipe off any excess pre-stain wood conditioner before applying the stain. A clean, lint-free towel or rag will do wonders in removing this excess residue from your project.
Step 6: Prepare the Wood Stain
We recommend stirring your wood stain with an old-fashioned wooden stick before staining. It’ll ensure everything gets evenly distributed and protects all parts from drying out too quickly, which could lead to cracking when applied thickly without sufficient time between coats.
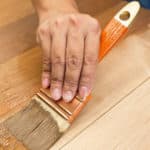
Step 7: Apply the Wood Stain
You can use a new foam brush to apply the wood stain, perfect for projects made from wood with pronounced grain patterns. Dab some into the deeper grooves and knotholes if you’re working against them, or even work quickly across an entire surface area to avoid losing your desired look.
Step 8: Wait to Dry
Let the stain sit for 1 to 3 minutes to give it more depth. If you need darker stains before removing them, try adding coat after they’ve dried and are still wet.
Step 9: Wipe Off the Excess Stain
Clean up any excess stain with a new lint-free cloth, going along the grain to avoid swirls or marks in your finish. Let dry for 1 hour before applying another coat of wax or polycrylic topcoat.
This is how you stain wood in just a few simple steps!
Ensure that your rags and brushes are laid out flat to dry, especially if they’ve been used with oil-based stains.

Frequently Asked Questions
What Should You Use to Apply the Stain?
One of the most important parts of staining is choosing what you will use for your project and how much. There are a few different options, but if we were talking just basic paint stains, there would be two: water-based or oil-based finishes with brushes meant only one way (one type), respectively.
For water-based stains, use a bristle brush meant for acrylic or latex paint. You can also apply the same techniques using clean, lint-free rags.
Oil-based stains are great because they can be applied in many different ways. Oil-based finishes are designed to be used with a brush, but you could also use the same type of tools for water-based paints or latex paint, depending on your desired look.
What Happens If You Don’t Wipe Off Stain?
It is important to know that wood stain is designed for staining, not painting. If applied too thickly or with the excess stain left on after the project’s completion, it can ruin any surface beneath due to its sticky nature, so be mindful when handling this product.
Should I Sand Between Coats Of Stain?
Sanding is a great way to remove any imperfections in your project before applying the final coat, but it’s unnecessary. The surface will be smoother and more beautiful with each pass of the grit sandpaper. Use extra-fine steel wool if there are still some rough spots after one coat has dried.
Conclusion
Staining wood is a great way to add depth and character to any project. It’s important to know the different types of stains, how to apply them, and what kind of finish you desire before beginning. With these helpful tips, you’ll be sure to achieve the perfect look for your next big project!