Wooden furniture is a great addition to any home, but when it starts looking old and worn out, it can be difficult to find the motivation to re-stain. While this project may seem tedious, there are many benefits that come with properly staining furniture.
This blog post will teach you 13 steps for how to stain wooden furniture like a pro!
Step 1: Clean the Furniture
The first step to staining wooden furniture is removing all dirt and grime from both the wood surface as well as any hardware that will remain on your piece.
You can use soap and water for this step, but be aware of how the stain will react to moisture.
Using a non-toxic cleaner, such as TSP (trisodium phosphate), clean every part of your furniture until it shines without residue. Ensure you also clean the hardware using a non-toxic cleaner to remove any dirt or grime.
If you have stubborn stains on your wood, there are other options available such as mineral spirits, vinegar, or acetone.
Step 2: Prepare for Staining
Now that your furniture is clean, it’s time to prepare for staining. To start off the staining process properly, cover your work area with paper or plastic to prevent spills from damaging other surfaces in your home.
Use painter’s tape and mask off areas you don’t want to be stained with an appropriate covering such as newspaper. If you’re going to paint a design or add a stencil, use painter’s tape to create your desired pattern.
If it is too late for that, grab some rags and try to soak up as much of the stain as possible.
Step 3: Choose Your Stain
There are hundreds of different types of stains to choose from. Depending on the color you want, there is a specific wood stain that will achieve your desired look.
Different stains will give wood different finishes, so it is important to use the right stain for your furniture. For example, if you are staining a light-colored wooden urn, choose an oil-based stain that won’t be diluted by any water in the urn.
On the other hand, if you are staining a dark-colored wooden cabinet, choose an acrylic-based stain that won’t leave the wood tacky and sticky.
Each type also has its own application process and drying time so make sure to do your research before buying anything. If in doubt, check out our review of the best stains for pine.
Step 4: Prepare Your Furniture
Once you have chosen your stain, it’s time to prepare your furniture. The first step is sanding the surface of the wood with fine-grit sandpaper (220 or higher). While this may seem like an unnecessary step when only staining over existing paint, doing so will ensure that the stain soaks into your wood evenly.
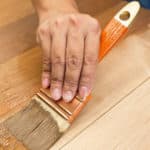
Step 5: Apply Stain to Furniture
Now that you have your furniture covered and ready for staining, it is time to apply the stain. Use a high-quality paint brush with natural hairs such as bristle brushes designed specifically for oil-based paints and stains.
Apply your stain evenly and allow it to completely dry before moving on to the next step.
For example, using an oil-based polyurethane can be done with a brush or rag, but using water-based stains requires you to spray it on. Make sure to read the instructions for your specific type of stain and follow them accordingly.
Step 6: Wait & Reapply Stain as Needed
All wood stains have different application processes and drying times so make sure that you check the label before you start. Once you have applied your stain to the furniture, make sure that it gets enough time for drying.
If applying multiple coats of stain, be aware of how long each one takes before moving on to another step in this blog post.
Step 7: Protect Furniture with a Clear Coat
Wood stains are beautiful but they need a clear coat to protect them from the elements. This step is especially important if you live in a humid climate or have pets that may be tempted to scratch your furniture.
Clear coats also help keep stains looking fresh and new so it’s worth investing in this extra layer of protection for better longevity.
Step 8: Wax Furniture
To finish your furniture, apply a coat of wax with a lint-free cloth. Allow this to dry for about 15 minutes before removing the excess wax from your piece using another clean, lint-free cloth.
Step 9: Buff Wax
Buffing is what will give you that gorgeous shine. Use an orbital sander or hand-buff your wax to a nice sheen with circular strokes.
Step 10: Add Hardware
Finally, you are ready to add the hardware back onto your furniture. If needed, use an electric drill or screwdriver for larger pieces of wood with various screws and bolts that need attaching. Some people like to paint their hardware prior to adding it back onto their furniture.
Step 11: Enjoy Your Newly Stained Furniture
Once your piece of furniture has dried and you have applied a clear coat, it’s time to enjoy the fruits of your labor. Make sure that you do not place any heaters or candles above stained wooden furniture for at least 24 hours.
This will ensure that all wood finishes have been set properly before being exposed to the elements.
Step 12: Maintain Furniture Over Time
Just like with any other home improvement project, it’s important to maintain your newly stained furniture over time. This is especially true if you live in a humid climate or have pets that may be tempted to scratch the surface.
To keep stains looking fresh and clean, use a warm rag and wipe them away. This should only be done once the wood finishes have fully dried to avoid damaging your furniture.
Step 13: Enjoy Your Finished Furniture
By following these steps, you’ll enjoy beautiful stained wooden furniture for years to come! After staining and protecting your piece, make sure that it’s properly cared for over time by following the steps in this blog post.
Conclusion
Congratulations! You’ve made it to the end of this blog post on how to stain wooden furniture like a pro. If you follow these 13 steps, your old and worn-out furniture will look as good as new in no time. Why not give staining your wood furniture a try?