Are you tired of the look of your stained wood furniture or home decor but don’t want to throw it out? Believe it or not, painting over stained wood is an easy and effective way to give your items a brand-new look.
Painting over stained wood not only provides a fresh look but also enables you to add some personal touches of creativity to your items. What’s more? Painting over stained wood ends up extending the life of your household possessions.
In this article, I will walk you through the simple steps of painting over stained wood so that you can renew and revitalize your living space with minimal cost and effort.
Preparation
Before diving into painting over stained wood, it is essential to have the right tools at hand.
Some of the tools you will need for this project include:
- Sandpaper of either 120 or 220 grit
- An electric sander (optional)
- Painter’s tape
- Rags or paper towels
- Primer
- Paintbrushes or rollers
- Paint in your choice of color
Once you have gathered all the necessary items, the first step is to ensure that the surface of the stained wood is clean and smooth. To do this, I suggest using a damp cloth or paper towel to wipe the surface down, removing any dust or debris.
After that, use sandpaper or an electric sander to make the wood surface even. Sanding the surface of the wood helps the primer stick to the surface evenly.
Start with the rougher sandpaper and work your way up to the finer grit to achieve the desired level of smoothness. Be sure to dust away any leftover debris before proceeding.
After sanding, apply a coat of primer to the surface. Priming the surface creates a base that ensures an even application of paint, covers up any stains or marks, and prolongs the life of the painted surface. Wait for the primer to dry before moving on to the next step.
Great! You’ve now prepared the surface, and it’s time to move on to the next step, painting.
How To Paint Over Stained Wood?
Are you ready to see your stained wood items take on a new life? The next step in painting over stained wood is choosing the right paint for your project. Consider the surface and the look you want to achieve, as this will determine the type and finish of paint that you will need.
Latex paint with a semi-gloss or gloss finish works well for most projects. However, if the surface is expected to receive a lot of wear and tear, opting for a more durable paint such as enamel will be the best choice.
Oil-based paint is also an option that is worth considering, as it gives a harder finish and lasts longer than latex-based paints.
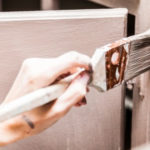
Following the best practices to achieve the desired results is essential when painting. Use a paintbrush or roller to apply the paint to the prepared stained wood surface.
Using a paintbrush, use long strokes and avoid over-brushing to prevent imperfections. On the other hand, if you choose a roller, ensure the surface is entirely covered with paint.
After applying the first coat of paint, please wait for it to dry completely. Depending on the type of paint and the surface, this usually takes two to four hours. If needed, lightly sand the surface with fine-grit sandpaper to remove any bumps or nibs on the paint’s surface.
Once the surface is smooth, apply a second coat of paint. The second coat fills in gaps left after the first coat and covers the surface more evenly.
Apply the second coat of paint with the same technique used in the first coat, ensuring that you use long and light strokes with the brush or roll until you cover the entire surface. Wait for the second coat of paint to dry before any further legwork.
In rare instances, applying an additional coat of paint may be necessary to ensure you achieve the desired finish. More specifically, this is the case for those wishing to achieve a higher gloss level or stain for darker paint shades.
Before proceeding, ensure that the surface is adequately prepared for the additional coat of paint. Coat the surface following the same steps used in the first and second coats of paint.
Once you’ve finished painting, allow the surface to dry completely. It’s worth noting that the drying process may take up to twenty-four hours or more. It’s best to wait twenty-four hours before handling or putting anything on the newly painted surface, as it allows the paint to cure and harden thoroughly.
Finishing Touches
The final steps in painting over stained wood are often overlooked but important. After waiting for the paint to dry completely, it’s time to remove any painter’s tape and clean up the area.
Removing painter’s tape can be a delicate task not to ruin the painted surface. I suggest gently peeling the tape away from the surface without pulling or chipping the paint.
If there is any paint seepage, you can remove it using a razor blade. You will be amazed by how clean and polished the edges of your newly painted item look when you patiently remove the tape.
After removing the painter’s tape, it’s time for cleanup. Debris and dust particles often accumulate in and around the area during painting. Clean the area using a damp cloth or paper towel to remove dust particles.
It’s also essential to note that proper care of the newly painted surface is critical to its longevity. Avoid harsh cleaning agents and chemicals as they may damage the surface’s finish. Stick to a mild soap and water solution and wash gently to avoid erosion or damage to the paint.
Conclusion
I hope the steps outlined in this article have given you the confidence to tackle your next DIY painting project successfully. Before starting the process, ensure you have all the necessary tools and materials, including primer and paint in your desired color.
I believe painting over stained wood is an excellent way to give your household items a new lease on life while adding some personal touches of creativity. With the right approach and a little patience, it’s easy to achieve a professional-looking finish that will enhance the look of any room in your house.
By properly preparing the surface, choosing the right paint, and following the steps in this article, you can ensure that your painted surface will look great for years to come. After finishing, don’t forget to remove any painter’s tape carefully and clean the area properly.
Frequently Asked Questions
What Kind Of Paint Do You Use Over Stained Wood?
You can use either latex or oil-based paint over stained wood. Latex paint is the simplest to work with and securely attaches to the wood surface. It is also less likely to yellow over time.
Oil-based paint will provide a more durable finish, but it can be difficult to apply evenly. When painting over a water-based wood stain, use a latex primer. This will help the paint adhere properly and prevent the color from bleeding.
After the primer has dried, you can apply a top coat of paint using a brush or roller. For best results, choose a paint color similar to the stain. This will help to camouflage any imperfections in the finish.
What Happens If You Paint Over Stained Wood?
Many people assume they must strip the stain off before painting, but this is not always true. If the wood is not glossy, the paint will have no problem adhering to it.
If the wood is too rough in some places, you only need to sand it. However, if the stain is glossy, use a primer before painting. This will help create a smooth surface to which the paint can adhere.
So, whether or not you need to strip the stain off before painting depends on the type of stain and the level of glossiness. In either case, a little preparation will go a long way toward ensuring a smooth and successful paint job.
Conclusion
Stained wood can be difficult to paint but can be done with the right preparation and techniques. Be sure to sand, prime the wood before painting, and use a good-quality sealer. Apply several coats of paint for even coverage, and remove the masking tape once finished.
If you want, you can also apply a clear coat or wax to make your project shine. You can transform stained wood into a beautifully painted surface with little effort.